lördag 16 augusti 2014

Efterlysning: Vem stickade Krondahls mössa?

Professor Krondahls mössa
Cirka1965 höll textilkonstnär Hans Krondahl, senare Sveriges förste professor i textil konst, en kurs på Sätergläntan. En kursdeltagare stickade en mössa som hon gav till honom. Mössan ses i fotot ovan.

Vem var stickerskan?

Hans Krondahl tror att hon kom från Kiruna eller Harparanda. Gick du på kursen? Vet du vem som stickade mössan? Vi vill gärna ha kontakt med stickerskan för att få närmare uppgifter om mönstret, garnet och stickorna.

Om du är stickerskan, eller har uppgifter som kan hjälpa oss få kontakt med stickerskan, skicka ett mail till:  fabricpattern@mail.com

Sprid gärna denna information vidare om du tror att det kan hjälpa till att finna stickerskan. Jag har inget Facebook-konto så om du är med i lämpliga grupper där får du gärna länka till detta inlägg.
Hans Krondahl med mössan. (foto: Lars Hall)
Who knitted this cap?
Around 1965 textile artist Hans Krondahl, who later was to become Sweden´s first Professor in Textile Art, held a course at Sätergläntan. One of the participants knitted a cap that she gave to him. The cap is seen in the photos.

Who was the knitter? Hans Krondahl thinks that she came from Kiruna or Haparanda. Did you attend the course, or do you know who knitted the cap? We would very much like to get in touch with the knitter to get more information about the pattern, the yarn and the needles used.

If you are the knitter, or have information that can help us to get in touch with the knitter please send a mail to: fabricpattern@mail.com

Do feel free to share this information on the internet or otherwise. I am not on Facebook, so if you know about any Facebook groups where this could be shared please do.

torsdag 14 augusti 2014

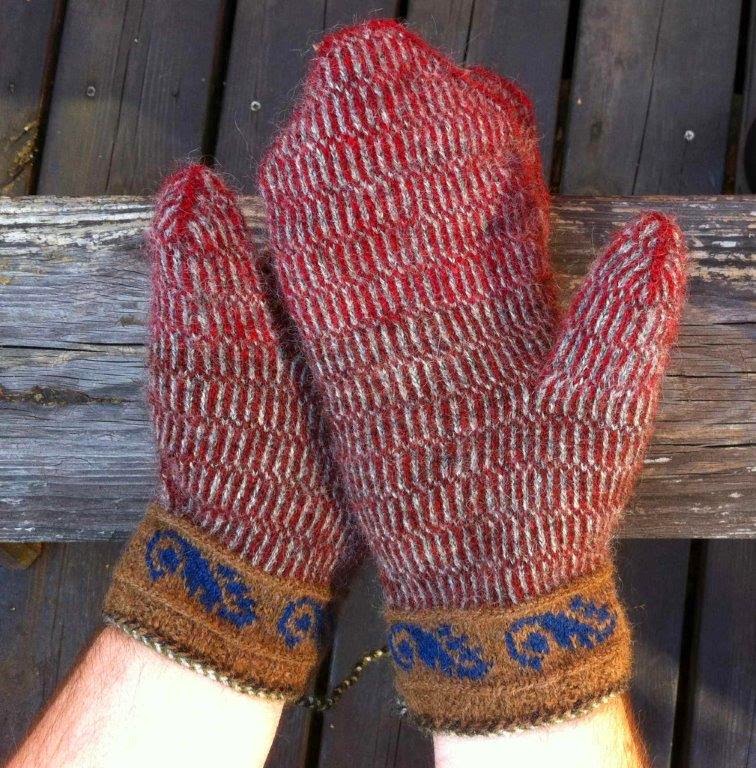
Summer knitting - Twined knitted mittens

This summer has been very warm in Sweden. So, no need for knitted mittens. But knitting is hard to abstain from - I have been knitting mittens.
I had some left-over yarn for twined-knitting that I wanted to use in a project instead of leaving it to no use. A grey, two reds, brown, blue and a little bit of green all from Wålstedts. The "design" I used was not complicated, mostly stripes.
I have knitted mittens in this way a couple of times before. This time I decided to start with a cuff to be able to use some of the colours that I only had a small amount left of. The stitch pattern in blue is often found on knitted sleeves in Dalarna (Dalecarlia).


onsdag 30 juli 2014

A visit to Vitlycke museum and the fabulous rock-carvings (Petroglyphs) at Tanum

Reconstructed Bronze Age clothing
During our week in Grebbestad we got to visit the Vitlycke museum. Of special interest was of course (since we were attending a weaving course) the reconstructed clothing of the people that long ago lived in this part of Sweden.
Lena Hammarlund
Out teacher Lena Hammarlund shared her vast knowledge regarding ancient weaving and how to analyse and reconstruct the weaving process/technique and from that make, as close as possible, replicas of the old fabrics. 
Decorated sleeve
If you think that clothes looked like rags during the Bronze Age you are wrong. The weaving was often done with fine threads and great skill. Decorations in embroidery or nalbinding were also sometimes added.
Decorated neckline
The museum also features a Bronze Age Farm which we visited.
The Bronze Age Farm
The Farm has two reconstructed longhouses, from the Early and the Late Bronze Age. These kind of houses were used in Sweden for thousand of years (from the end of the Stone Age until the end of the Iron Age).
Interior with an opstadgogn (warp-weighted loom)
The Bronze Age Farm is built to show some of the every day life. In one of the longhouses we found an opstadgogn with a weave. This loom one had a more authentic look to it compared to the ones that we used in class.
Interior of a longhouse
And then it was time for the rock-carvings. I must admit that they were something that I really had looked forward to see in real life. I was not disappointed.
Tanum: Rock-carvings
The rock-carving area at Tanum is now included in the World Heritage List. This is the World Heritage Committee’s citation: ‘The rock carvings in the Tanum area are a unique example of Bronze Age art of the highest quality. The range of motifs provides rare evidence of many aspects of life in the European Bronze Age. The interplay of continuous settlement and land use, as reflected in the rock carvings, the burial grounds and the landscape, make the Tanum area an outstanding example of uninterrupted settlement for eight thousand years’.
Tanum: Rock-carvings

For more information regarding Vitlycke and Tanum:
Vitlycke museum start page
The Bronze Age Farm
The World Heritage Area at Tanum


måndag 21 juli 2014

Weaving Viking Style in Grebbestad - Opstadgogn

Opstadgogn
We had the opportunity to attend a weeks course in weaving on a warp-weighted loom, also called an opstadgogn. Weaving is really not my forte but I was intrigued to get the chance to try a technique so old and once spread almost all over the world. The course was held at Grebbestads Folkhögskola and our teacher was Lena Hammarlund, assisted by Margareta Ovelius. Many thanks to both of them for being such skilled instructors and nice people.
Making a warp for the startingborder
We started by making the warp for a starting border. Making the warp for the opstadgogn starts with weaving a band were the weft will become the warp of the main weave. I know it sounds a bit complicated but it is a very clever solution.
Weaving the starting border and making the warp at the same time
Here I am weaving the band and at the same time pulling the weft out (200 cm) to my right letting it form the warp for my weaving on the opstadgogn. I am planning a weave 120 cm long.
Sewing the band (warp) to the loom
When I have enough threads for the warp (240) I take the band and sew it on to the top part of the opstadgogn (the cloth beam). When I place this back in the opstadgogn the long threads that form the warp will be hanging down as they are supposed to.
The starting border sewn to the cloth beam
The warp - note that we have separated the front and back layer
of the warp (knots at the bottom)


Separated front and back
Cutting the warp threads


Tying the layers separately and putting the front layer
over the cloth beam to be able to work with the back layer


Preparing weights
The opstadgogn is a warp-weighted loom. We used bags filled with sand as weights. I needed 24 bags. I my case all should have a weight of 700 grams.
Counting threads - preparing attaching the weights
Next step was to distribute the threads evenly for the weights. In my case that meant 10 threads per weight of 700 grams, equal to 70 grams of weight per thread.
Attaching the weights
Above you can see me attaching the weights. Note that the back layer of the warp was done first. After attaching the weights you make a crocheted chain to keep the threads in order.
Tying heddles
After all weights were attached it was time for placing the heddle rod and starting tying heddles. Tying heddles is very precise work. Make one mistake and you will regret it. This was when I realised that weaving is a craft for untiring perfectionists.
Shed
If the heddles are tied correctly you should end up with a nice and faultless shed. This was the end of day two -  and I cannot describe the relief I felt when my shed turned out as it should. Dressing the loom finished after two days.
Weaving on the opstadgogn
Day three - I started weaving. This was something I had been looking forward to during the first days.
Weaving sword
We used weaving swords while weaving.
Making progress
The rest of the week was pure entertainment. Weaving was a straight forward business and I was suprised that I really liked it a lot.
In the loom
I had chosen a rather thick Rya-yarn that had a nice robust feel to it and I really liked the fabric that I saw in my loom.
Finished with fringes
On Friday I finished my work and I was taught how to make a nice fringe as a finishing. I cut my weave down. Washing will be done at home. This was a very educational week and I learned a lot. Perhaps weaving is something that is not out of my grip after all. I will have to practice more. I attended this course with my husband ("Knotting" on Ravelry) who is more of a weaver than I am. We are now seriously considering getting an opstadgogn since we both found this week fun and rewarding.
Grebbestad

Grebbestad
We did not spend all time indoors this week. The weather was fantastic and Grebbestad offers a lot of beautiful views.
At home - washed and ready for use.

Finally, here are some links to videos on Youtube for those of you who would like to see weaving on an opstadgogn. The films "Norsk-samisk Grenevaeving" from Senter for Nordlige Folk/Manndalen, are in five parts.

part 1
part 2
part 3
part 4
part 5

lördag 19 juli 2014

A visit from the Netherlands

Our friend Mirjam from the Netherlands came to visit us on her way to Sätergläntan. Here are some photos showing the results of her awesome band weaving.